
If you're looking to whip up something delicious with canned cherries, you're in for a treat. Canned cherries are super handy and can turn into some seriously incredible desserts. From classic cherry pie to fun cherry hand pies, there's a recipe for everyone. Plus, who can resist the layers of flavor in cherry pie parfaits? Let's explore these five best canned cherry pie recipes and get your taste buds ready for a sweet adventure!
Classic Cherry Pie
Classic cherry pie is a timeless dessert that's perfect for any occasion, whether it's a summer barbecue or a cozy winter gathering. Utilizing canned cherries makes this recipe simple and accessible, allowing you to enjoy the rich, sweet-tart flavor of cherry filling nestled in a flaky, buttery crust.
With just a few ingredients and easy steps, you can create a delightful pie that will impress your family and friends.
Ingredients:
- 1 can (21 oz) cherry pie filling
- 1 pre-made pie crust (store-bought or homemade)
- 1 tablespoon lemon juice
- 1 tablespoon cornstarch
- 1 teaspoon vanilla extract
- 1 tablespoon sugar (optional, for sprinkling)
- 1 egg (for egg wash)
Instructions:
Preheat your oven to 425°F (220°C). In a mixing bowl, combine the canned cherry pie filling, lemon juice, cornstarch, and vanilla extract, stirring well to guarantee the cornstarch is evenly distributed.
Roll out one of your pie crusts and fit it into a 9-inch pie pan. Pour the cherry mixture into the crust, spreading it out evenly. Cover with the second pie crust, crimping the edges to seal. Cut slits in the top crust to allow steam to escape, and brush the crust with a beaten egg for a golden finish.
If desired, sprinkle sugar on top for extra sweetness. Bake in the preheated oven for 35-40 minutes, or until the crust is golden brown and the filling is bubbly. Allow the pie to cool for at least 10 minutes before slicing.
Extra Tips:
For a deeper flavor, consider adding a pinch of almond extract to the cherry filling, as it pairs wonderfully with cherries.
If you prefer a slightly less sweet pie, reduce the sugar in the filling or skip the sugar sprinkle altogether. To guarantee a perfectly baked crust, you can place a baking sheet on the rack below the pie to catch any drips.
Finally, serve your classic cherry pie with a scoop of vanilla ice cream or a dollop of whipped cream for an extra special treat!
Cherry Pie Parfaits
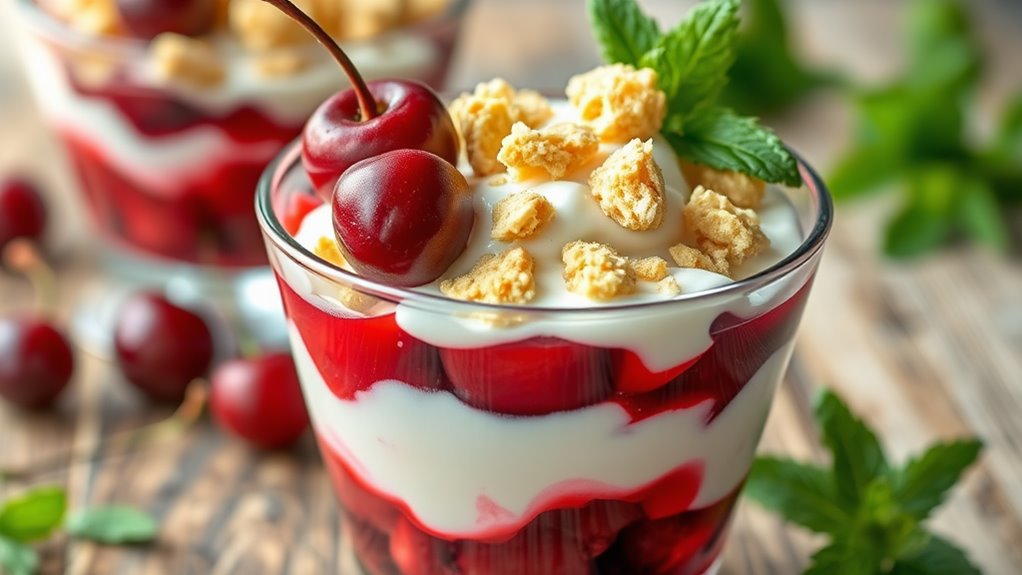
Cherry Pie Parfaits are a delightful and easy-to-make dessert that brings the classic flavors of cherry pie into a convenient and visually appealing format. Perfect for parties or a simple family treat, these parfaits layer creamy vanilla pudding, crunchy graham cracker crumbs, and sweet canned cherries for a deliciously satisfying experience.
With just a few ingredients, you can whip up individual servings that are sure to impress your guests and satisfy your sweet tooth.
Ingredients:
- 1 can of cherry pie filling
- 1 cup of vanilla pudding (store-bought or homemade)
- 1 cup of graham cracker crumbs
- 1 cup of whipped cream (store-bought or homemade)
- Fresh cherries for garnish (optional)
Instructions:
In a clear glass or dessert cup, start by layering the ingredients: first, add a spoonful of graham cracker crumbs at the bottom, followed by a layer of vanilla pudding, then a layer of cherry pie filling.
Repeat these layers until the cup is filled, finishing with a generous dollop of whipped cream on top. For an added touch, you can garnish with fresh cherries or a sprinkle of graham cracker crumbs for decoration.
Chill the parfaits in the refrigerator for about 30 minutes before serving to allow the flavors to meld.
Extra Tips:
Feel free to customize your Cherry Pie Parfaits by adding other layers such as chocolate pudding or almond extract for a nutty flavor.
If you prefer a less sweet dessert, you can reduce the amount of whipped cream or use unsweetened whipped topping. For crunch, consider adding nuts or toasted coconut in between the layers.
These parfaits can be prepared a few hours in advance, making them a great option for stress-free entertaining!
Cherry Crisp
Cherry crisp is a delightful dessert that combines the sweet and tart flavors of cherries with a crunchy, buttery topping. This dish is perfect for showcasing canned cherries, making it a convenient option for any gathering or a cozy night in.
Whether served warm with a scoop of vanilla ice cream or enjoyed on its own, cherry crisp is sure to please everyone at the table.
Ingredients:
- 2 cans (15 oz each) of cherries, drained
- 1 cup granulated sugar
- 1 tablespoon cornstarch
- 1 tablespoon lemon juice
- 1 cup rolled oats
- 1 cup all-purpose flour
- 1/2 cup packed brown sugar
- 1 teaspoon ground cinnamon
- 1/2 cup unsalted butter, melted
- 1/2 cup chopped nuts (optional)
Instructions:
Preheat your oven to 350°F (175°C). In a mixing bowl, combine the drained cherries, granulated sugar, cornstarch, and lemon juice, stirring until well mixed.
Pour this cherry mixture into a greased 9×13 inch baking dish. In another bowl, mix the oats, flour, brown sugar, cinnamon, and melted butter until crumbly. If you're using nuts, fold them into the topping mixture.
Spread the oat mixture evenly over the cherries in the baking dish. Bake in the preheated oven for 30-35 minutes, or until the topping is golden brown and the cherries are bubbling.
Extra Tips:
For an added depth of flavor, consider using almond extract or vanilla extract in the cherry mixture.
If you prefer a bit of tartness, you can mix in some fresh or frozen sour cherries with the canned ones. To make the crisp even more appealing, serve it with whipped cream or a scoop of ice cream right after it comes out of the oven.
To store leftovers, cover the dish and keep it in the refrigerator for up to three days, reheating individual portions in the microwave or oven.
Cherry Cheesecake Bars
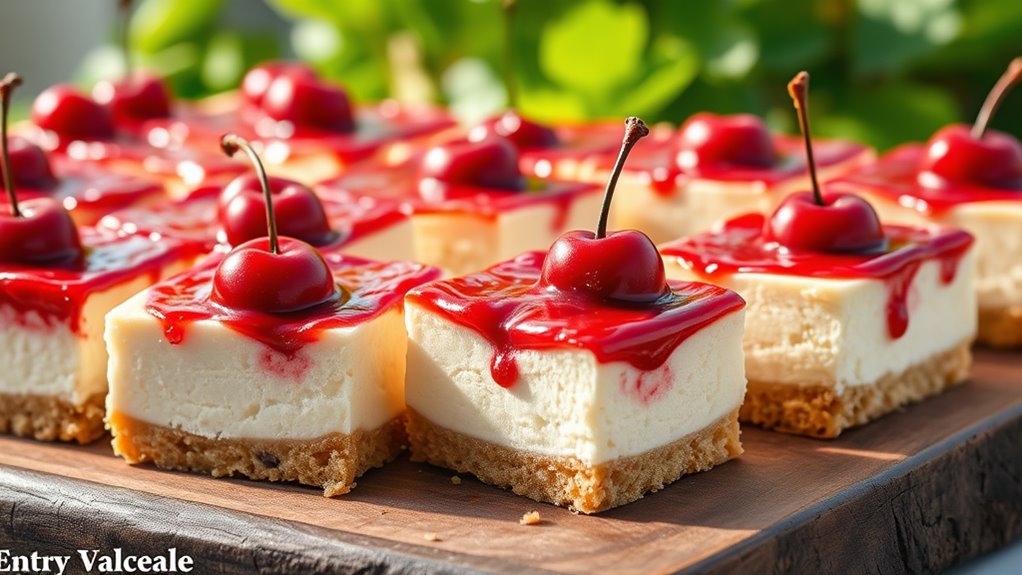
Cherry cheesecake bars are a delightful dessert that combines the rich, creamy goodness of cheesecake with the sweet-tart flavor of cherries. They're perfect for gatherings, picnics, or simply enjoying at home.
Using canned cherries makes this recipe quick and convenient, allowing you to whip up a delicious treat with minimal effort. These bars are sure to impress your family and friends with their vibrant color and luscious taste.
Ingredients:
- 1 cup graham cracker crumbs
- 1/4 cup granulated sugar
- 1/2 cup unsalted butter, melted
- 16 oz cream cheese, softened
- 1/2 cup powdered sugar
- 1 teaspoon vanilla extract
- 2 large eggs
- 1 can (21 oz) cherry pie filling
Instructions:
Preheat your oven to 325°F (160°C) and line a 9×9-inch baking pan with parchment paper.
In a mixing bowl, combine the graham cracker crumbs, granulated sugar, and melted butter, mixing until well combined. Press this mixture firmly into the bottom of the prepared baking pan to form the crust.
In another bowl, beat the softened cream cheese with powdered sugar and vanilla extract until smooth and creamy. Add in the eggs one at a time, mixing until fully incorporated.
Pour the cheesecake mixture over the crust and smooth the top. Spoon the cherry pie filling evenly over the cheesecake layer.
Bake for 30-35 minutes or until the center is set but still slightly jiggly. Allow the bars to cool completely before refrigerating for at least 2 hours before slicing into squares.
Extra Tips:
For an added depth of flavor, consider mixing a teaspoon of almond extract into the cheesecake batter alongside the vanilla.
Be sure to let your cheesecake bars cool completely before cutting, as this helps them set and makes for cleaner slices.
If desired, you can also top the cooled bars with whipped cream or additional cherries for a beautiful presentation.
Enjoy your cherry cheesecake bars chilled for the best taste!
Cherry Hand Pies
Cherry hand pies are a delightful treat that combines the sweet and tangy flavors of cherries with a flaky, buttery crust. They're perfect for a quick dessert or snack, and using canned cherries makes the process even simpler.
These individual-sized pies are easy to make, and their portable nature makes them great for picnics, parties, or just enjoying at home. With a golden-brown exterior and a warm, gooey cherry filling, cherry hand pies are sure to please everyone.
Ingredients:
- 1 can of cherry pie filling
- 1 package of refrigerated pie crusts (2 crusts)
- 1 egg (beaten, for egg wash)
- 1 tablespoon sugar (for sprinkling)
- 1 teaspoon vanilla extract (optional)
- Flour (for dusting)
Instructions:
Preheat your oven to 400°F (200°C). On a lightly floured surface, roll out the pie crusts and cut them into circles, about 5 inches in diameter.
Place a tablespoon of cherry pie filling in the center of each circle, and if desired, add a drop of vanilla extract for extra flavor. Fold the crust over to create a half-moon shape, and press the edges with a fork to seal.
Place the hand pies on a lined baking sheet, and brush the tops with the beaten egg. Sprinkle sugar on top for added sweetness and texture. Bake in the preheated oven for about 20-25 minutes, or until they're golden brown.
Extra Tips:
For a twist, consider adding a pinch of cinnamon to the cherry filling for a warm flavor.
Make sure to keep the edges of the crust clean before sealing to prevent any leaking during baking. If you have leftover pie crust, you can create mini pies or use it for decorative cut-outs on top.
Allow the hand pies to cool slightly before serving, as the filling can be very hot. Enjoy them warm or at room temperature!